Automating Long Video Splitting into Short Clips Using Python
Overview
In today’s digital world, AI-powered automation has completely transformed the way content is created and managed. Many repetitive tasks that once required manual effort can now be handled automatically by setting up a proper automation workflow. Once the system is configured, the rest of the work runs smoothly with minimal human involvement.
However, most advanced automation tools available online are paid, and not everyone is able to afford these subscriptions. I personally faced this issue, which motivated me to start building my own local automation solutions using Python. Python is open-source, beginner-friendly, and extremely powerful—making it a perfect choice for automation projects.
Why Video Automation Matters Today
Short-form video content dominates platforms like Instagram Reels, Facebook Reels, and YouTube Shorts. You may have seen many pages that upload short anime, cartoon, or funny clips and still manage to gain thousands or even millions of followers. The secret lies in consistency and automation.
Manually cutting long videos into short clips is time-consuming. This is where Python-based video automation becomes extremely useful.
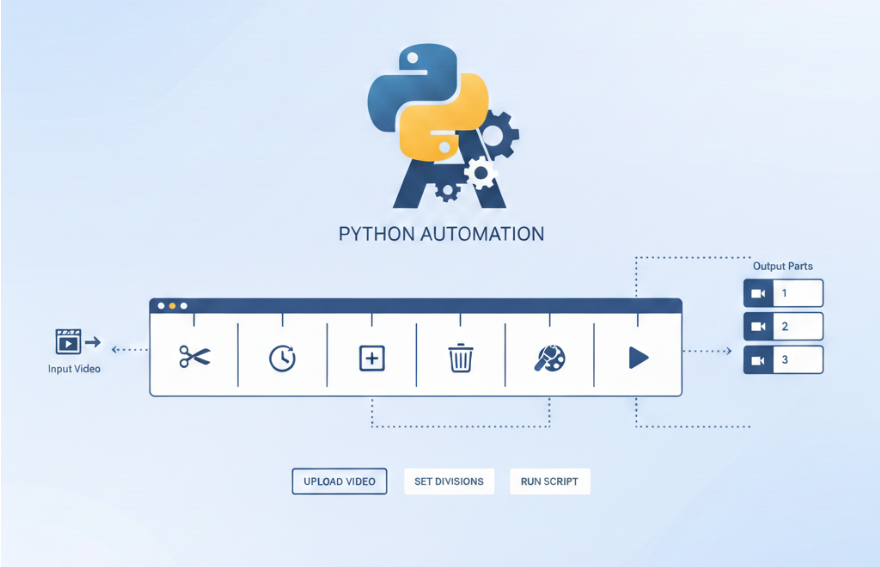
What This Automation Does
In this project, we create a simple automation system that:-
Takes one long video
-
Automatically splits it into equal-length parts
- Saves each part as a separate video file
-
Makes the clips ready for social media upload
Project Structure and Version-Based Approach
This automation project is designed using a version-based development approach:
-
Version 1: Basic automation to split a video into multiple parts
-
Future versions: Advanced features will be added based on real-world needs
Each version will be clean, beginner-friendly, and well-structured. The complete source code will be provided below and will also be available on GitHub, where updates will be managed version by version—from beginner to advanced level.
How to Get Started
To begin, create a Python file on your system named:After creating the file, copy and paste the code below into it.
This code handles the core logic of splitting a long video into smaller clips automatically.
Python Code: Automatic Video Splitting Logic
Code Setup and Working Explanation
Before understanding how the Python code works internally, it is important to properly set up the environment. The following steps explain how to prepare the system and run the script successfully.Step 1: Install Python
First, make sure Python is installed on your system.-
Python version 3.10 or higher is recommended
- You can verify the installation by running:
Step 2: Install MoviePy Library
This script uses the MoviePy library to handle video processing. Install MoviePy using pip:Step 3: Prepare the Project Folder
Create a new folder for the project and place the following files inside it:-
The Python script file (for example:
video-cutting.py) -
The video file you want to split (for example:
anime.mp4)
Step 4: Configure the Script Settings
At the top of the script, you will find a settings section.
This is where users can customize the behavior of the code.
-
Set the
input_videovariable to the video file name or path -
Set the
part_durationvalue to define how long each video part should be (in seconds) -
Set the
output_foldername where all video parts will be saved
Step 5: Run the Script
Open a terminal or command prompt inside the project folder and run:How the Code Works Internally
The script begins by importing the required modules for file handling and video processing.
It then creates the output folder if it does not already exist, ensuring that the generated video parts are stored in an organized way.
During each loop iteration, a small portion of the video is extracted using MoviePy’s subclipped() method. This extracted clip is saved as an MP4 file using standard video and audio codecs for compatibility.
Watch the Complete Setup and Usage Video Tutorial
To help users understand this Python video splitting script more clearly, we have created a simple step-by-step video tutorial. In this video, we explain:- How to set up Python on your system
- How to install the MoviePy library
- How to configure the script settings
- How to run the video splitting code
- How the code works internally
Get the Source Code Using Git Clone
You can directly get the complete source code using Git. This is the recommended way, as it allows you to quickly copy the project to your system and receive future updates easily. Run the following command in your terminal or command prompt:View the Code Directly on GitHub
If you prefer to explore the code online before downloading it, you can view the complete project directly on GitHub. Visit the repository using the link below to:- Read the source code online
- Understand the project structure
- Check updates or improvements
- Download the code as a ZIP file
GitHub Repository:
=> https://github.com/bavliyavanraj/Video-Cutting-ScriptVersion-Based Folder Structure
We use a version-based folder system to manage improvements and updates in a clean and professional way. Each major improvement or update is placed in a new folder instead of modifying the old one. This ensures stability and transparency for users.
Example Folder Structure
│── video-cutting.py
│── README.md
│── (Improved version of the script)
│── README.md
How Versioning Works in This Project
-
V1 represents the initial stable version of the project
-
V2 will contain the next improved version of the code
-
Future updates will be added as V3, V4, and so on
- The complete Python script for that version
- A matching README file explaining that specific version
- Use a stable version without breaking changes
- Compare improvements between versions
- Learn how the project evolves over time
Why We Use This Versioning Approach
By creating a new folder for each improvement, we ensure:- Better code stability
- Clear project history
- Easy rollback to older versions
- Beginner-friendly learning experience
Continuous Improvements on GitHub
This project is actively maintained. As we improve performance, add features, or simplify the code, new version folders will be added to the GitHub repository. Users are encouraged to check the repository regularly for updates and improvements.Final Notes
This tutorial, along with the video explanation and GitHub source code, is created to make video splitting with Python as simple as possible. Whether you are a beginner or already familiar with Python, this setup allows you to start working with the code quickly and confidently.What Should We Write About Next?
We regularly publish beginner-friendly tutorials on Python, automation, and practical programming solutions.If you have any suggestions for the next blog topic, please share them in the comment section below.
Your ideas help us create content that is more useful and relevant for you.
Admin
User Reviews & Comments
Share your experience with this Blog. Your feedback helps our community make informed decisions!
Share Your Experience
Help others by sharing your thoughts about this Blog.
Related Blogs
Explore more Blogs in the same language

Automate Video Editing with Python: Add Dynamic Top & Bottom Text to Shorts
Python
Learn how to automate video editing with Python by converting long videos into Shorts or Reels. This tutorial explains dynamic top and bottom text overlays, auto-incrementing part numbers, MoviePy usage, and GitHub-based version updates with git pull or clone.

Final Instagram Reel Cutter Application Script
Python
This Python application automates video editing by splitting long videos into short clips with text overlays. It uses Tkinter, MoviePy, and Pillow to create reels efficiently.
No Reviews Yet
Be the first to share your experience with this Blog!